Using a click track during recording is, of course, imperative. We can't do our work if we can't play to the beat! Luckily for us Pro Tools makes it easy to set up a click track! Just simply go to Track on the menu bar, scroll all the way to the bottom and choose Create Click Track. Pro Tools will create an auxiliary track and automatically put a metronome plugin on the track. The metronome will automatically set to the tempo (bpm) of the song.
The metronome is customizable. You can change the sounds used for beat 1 and all other beats (2, 3, 4, etc.). The volume for beat 1 can be set and the volume for all other beats can be set to something different. I usually have mine set so that beat 1 is louder than other beats and is a different sound. That makes it easy to find the downbeat while tracking.
When I set up my templates, I already have the click track set up and ready to go! Easy! And since I organize and colorize my tracks, for me, the click track is all the way to the left in the Mix window and a bright lime green. I always know where it is in the session, no matter working in the mix or edit window.
Peace! And HEY! Make it a great day!
Tim
Showing posts with label sound engineer. Show all posts
Showing posts with label sound engineer. Show all posts
Saturday, September 1, 2018
Sunday, May 13, 2018
6 Recording Myths - Busted!
It is hard to learn how to record and mix music today. With so much information available on the web, sometimes it is hard to know if the information is true or not - whether it can be trusted or not. Here are six myths that are not true! Ask anyone who really knows his stuff and is experienced and successful.
 This myth is a good one to start with because like the best myths, there’s just enough of a grain of truth to it to keep it going. It’s true that the actual ribbon element can be more fragile than the diaphragm of a moving coil or condenser microphone. It’s also true that in the early days of ribbon mics, those classic RCA mics from the 1940s would fail readily if you tried to use them on a screaming guitar amp or a kick drum. However, that hasn’t been true for decades. These days, arguably the most venerated guitar cabinet mic, the Royer R-121, is a ribbon mic. Ribbon mics these days can easily withstand extremely high Sound Pressure Levels (SPL) and can be used on any source. Some ribbon mics such as the Shure KSM313/NE utilize a ribbon made of Roswellite, a substance created using carbon nanofilm technology that is virtually unbreakable and can endure levels up to 146dB SPL.
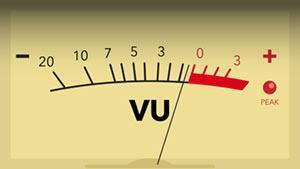 This is another myth that has roots in the early days of recording to tape. Back when your recordings had to stay above the noise floor of the tape, tracking too quietly could render your recording noisy and unusable. Not only that, but recording engineers realized that for rock music, slamming your recording levels produced a very pleasing tape compression and “heat” that could make things sound great. With digital recording, however, both of these are no longer true. With 144dB of dynamic range (24-bit recording) you can even record at -40dB and have 100dB of dynamic range. Early analog-to-digital converters (from decades ago) did sound better when recording near the top of their range but that is no longer the case. In fact, with digital recording, overloading your recording levels is decidedly unpleasant, resulting in a digital distortion when clipping that is ugly and abrasive.
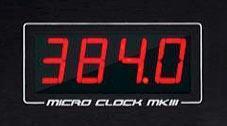 If you’re interconnecting a lot of digital gear you may want to use a master digital clock. Get the best clock you can afford, and make sure everything is connected properly via Word Clock cables. In many cases, the master clock won’t have a drastic influence on the sound; the uniform clocking simply makes everything work together without digital pops and ticks. Just taking your audio interface and hooking it up to an external clock isn’t going to improve the sound quality of its digital-to-analog and analog-to-digital converters unless the clock in your interface is really poor. If you really want to improve your recorded sound, get the best mics, preamps, and audio interface you can. Only buy an external digital clock after you’ve made sure the rest of your audio chain is the best it can be.
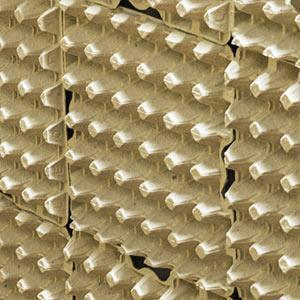 No, not even close! And despite what you may read on the internet, they don’t sound-proof anything. Materials such as drywall, insulation, and acoustic foam can be great acoustic treatment materials. With these materials and proper construction and application methods, you can effectively tackle the two general aspects of studio construction: isolation and acoustics. First, if you’re concerned with keeping sound from getting in or out of your recording space, you’ll need to tackle isolation. This is best done with some form of mass-air-mass construction. A wall with drywall and insulation, empty space, then another identical wall with drywall and insulation will provide a great start. For controlling the acoustics inside your space, you’ll need a combination of absorption and diffusion. There are myriad ways and a long list of proper materials to implement this — egg cartons and mattress foam are NOT on the list!
 In the early days of digital, this may have been true, but definitely not today. Sure, there are hardware compressors, equalizers, and effects processors with a certain mojo that sound amazing. But there are also digital software processors that sound incredible and offer a level of precision and recall that you’ll never get with external hardware. There’s a reason that nearly every pro studio has a ton of high-quality plug-ins even if they already have and use great outboard gear. You may like the sound of a piece of hardware, but you may like, or even prefer, the sound of a digital processor. The days of digital being second best are far behind us.
 It might seem counter-intuitive after all these “wrong” myths to proclaim that there’s no “right” way. But it’s true! One way of doing things may not get you the results you’re after, but then there are multiple ways that will. The name of the game is experimentation! Never stop experimenting and searching to find techniques that work for you, your music, your musicians, your studio. If you wonder if something will work, even if it seems patently false, give it a go! At worst you’ll need to redo it. At best you may add another unique tool to your toolbox. And that’s what recording is all about!
These are truths that all of us can learn from. I hope this helps musicians and engineers alike get better at their craft!
Peace - and HEY! make it a great day!
T
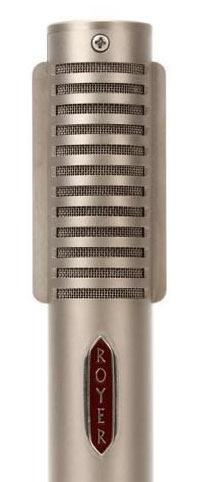
Myth 1 – You can’t use ribbon mics on loud sources
This myth is a good one to start with because like the best myths, there’s just enough of a grain of truth to it to keep it going. It’s true that the actual ribbon element can be more fragile than the diaphragm of a moving coil or condenser microphone. It’s also true that in the early days of ribbon mics, those classic RCA mics from the 1940s would fail readily if you tried to use them on a screaming guitar amp or a kick drum. However, that hasn’t been true for decades. These days, arguably the most venerated guitar cabinet mic, the Royer R-121, is a ribbon mic. Ribbon mics these days can easily withstand extremely high Sound Pressure Levels (SPL) and can be used on any source. Some ribbon mics such as the Shure KSM313/NE utilize a ribbon made of Roswellite, a substance created using carbon nanofilm technology that is virtually unbreakable and can endure levels up to 146dB SPL.Myth 2 – Always record as hot as you can
This is another myth that has roots in the early days of recording to tape. Back when your recordings had to stay above the noise floor of the tape, tracking too quietly could render your recording noisy and unusable. Not only that, but recording engineers realized that for rock music, slamming your recording levels produced a very pleasing tape compression and “heat” that could make things sound great. With digital recording, however, both of these are no longer true. With 144dB of dynamic range (24-bit recording) you can even record at -40dB and have 100dB of dynamic range. Early analog-to-digital converters (from decades ago) did sound better when recording near the top of their range but that is no longer the case. In fact, with digital recording, overloading your recording levels is decidedly unpleasant, resulting in a digital distortion when clipping that is ugly and abrasive.Myth 3 – External digital clocking improves the sound of your audio interface
If you’re interconnecting a lot of digital gear you may want to use a master digital clock. Get the best clock you can afford, and make sure everything is connected properly via Word Clock cables. In many cases, the master clock won’t have a drastic influence on the sound; the uniform clocking simply makes everything work together without digital pops and ticks. Just taking your audio interface and hooking it up to an external clock isn’t going to improve the sound quality of its digital-to-analog and analog-to-digital converters unless the clock in your interface is really poor. If you really want to improve your recorded sound, get the best mics, preamps, and audio interface you can. Only buy an external digital clock after you’ve made sure the rest of your audio chain is the best it can be.Myth 4 – Egg cartons or mattress foam are good acoustic treatments
No, not even close! And despite what you may read on the internet, they don’t sound-proof anything. Materials such as drywall, insulation, and acoustic foam can be great acoustic treatment materials. With these materials and proper construction and application methods, you can effectively tackle the two general aspects of studio construction: isolation and acoustics. First, if you’re concerned with keeping sound from getting in or out of your recording space, you’ll need to tackle isolation. This is best done with some form of mass-air-mass construction. A wall with drywall and insulation, empty space, then another identical wall with drywall and insulation will provide a great start. For controlling the acoustics inside your space, you’ll need a combination of absorption and diffusion. There are myriad ways and a long list of proper materials to implement this — egg cartons and mattress foam are NOT on the list!Myth 5 – External hardware always sounds better than digital plug-ins
In the early days of digital, this may have been true, but definitely not today. Sure, there are hardware compressors, equalizers, and effects processors with a certain mojo that sound amazing. But there are also digital software processors that sound incredible and offer a level of precision and recall that you’ll never get with external hardware. There’s a reason that nearly every pro studio has a ton of high-quality plug-ins even if they already have and use great outboard gear. You may like the sound of a piece of hardware, but you may like, or even prefer, the sound of a digital processor. The days of digital being second best are far behind us.Myth 6 – There’s a “correct” way to record
It might seem counter-intuitive after all these “wrong” myths to proclaim that there’s no “right” way. But it’s true! One way of doing things may not get you the results you’re after, but then there are multiple ways that will. The name of the game is experimentation! Never stop experimenting and searching to find techniques that work for you, your music, your musicians, your studio. If you wonder if something will work, even if it seems patently false, give it a go! At worst you’ll need to redo it. At best you may add another unique tool to your toolbox. And that’s what recording is all about!These are truths that all of us can learn from. I hope this helps musicians and engineers alike get better at their craft!
Peace - and HEY! make it a great day!
T
Thursday, March 2, 2017
Organize Pt. 2
Group Cabling
Keep cables grouped together by type (audio, MIDI, mains, etc.). This makes it easier to find faulty cables, patch equipment quicker and easier, and help reduce cable-borne noise problems. Putting a little distance between different types will reduce the potential for EMI (electromagnetic interference) problems, because mains cables can induce a 50Hz hum on audio cables. Always try to keep power cords of any kind separate from audio cables. If they do have to cross, try to do it at a 90° angle to minimize hum induction.
Use Cable Wraps
Using cable ties of some sort are definitely in order! Use Velcro or easy-release plastic ties. DO NOT use the infamous rock-n-roll duct tape! It will leave sticky residue once removed!
Label
Label Everything! I used to use the little string tags (and if I was to be honest, there are still some being used). But I did finally invest in a digital label maker. Good Investment! I now have 2 different tape sizes and label everything - patch bays, monitor control, hard drives, cables, wires, boxes, etc. You get the point!
'Faulty' Box
Get a large plastic box and label it "Faulty", "Not Working", "Needs Repair", "Bad" or something like this. You will end up with equipment that needs repair, faulty wires or cables, stomp boxes not working correctly, or just components that you can use later for recycling of parts. Almost everything in our studio can be repaired or used for parts. This helps keep unusable equipment from getting mixed up with the good. How many times have you reached for that cable that doesn't work or needs a wiggle when you use it! Throw it in the faulty box! When you have some time, get into the box and pick a project! Or better yet, sell the lot on eBay under 'needing repair' and get them out of your hair.
I now have initiated all of this in my own studio. I am much better organized, I have better workflow, waste less time and can focus more on my tracking or mixing. I hope this helps you too!
As always-
Make it a great day!
Tim
Monday, October 12, 2015
Unmount hard drives from within Pro Tools
Have you ever tried to eject a hard drive from your system that you used in a pro tools session while pro tools was still up and running? It didn't work, did it?
Here's the scenario:
You're working in a pro tools session and the client gives you a hard drive to grab wav files off of. So you take care of that, go to the desktop, and try to eject the hard drive (command E) since you're done with it. You get some dialog box that says the hard drive is in use and can't be ejected.
Now, in the old days, I always closed the pro tools session I was working on, closed the application, and then went and ejected the drive. Well there's a much better way!!
From within pro tools, go to the 'Window' menu command on the menu bar at the top of the screen. Under Window, go to 'Workspace'. On the left side it will show all hard drives on the computer. Select the one you want to eject (the client's hard drive). Then, at the top right of that same window there is a drop down arrow (in a circle), select that. Three quarters of the way down the menu list it says 'Unmount'. Select it and it will unmount (eject) the hard drive!
Awesome, right!? Knowing this little tidbit helps save time and makes you look more professional in front of the client! All in a day's work!
Peace!
And, HEY, make it a great day!
Tim
Monday, September 21, 2015
Demystifying Pro Tools Preference Settings part 3/3
OK today let's first go over the Editing tab. There's really only one item I want to make sure you know about. At the bottom of the page is 'Levels of Undo'. This preference sets the maximum number of actions that can be undone. The maximum is 32 levels of undo! That's a lot! You can "back up" 32 times. Sometimes I use this to my advantage - I may try something knowing that I can go back and undo whatever it is I'm trying. For instance, in editing I might try to edit two different sections together a certain way not knowing if it's going to work or not. And then if it doesn't work I can just back up until I see my two sections as they were in the beginning before I did any editing at all.
NOTE: The one thing to keep in mind is that setting this to a lower number can speed up the performance of slower computers.
The next tab in the preferences setup is Mixing. Under the Setup section I like to use the Default EQ and Default Dynamics windows. Here I set the EQ and Dynamics processors that I use most often. After setting them, they will show up when you're in the mix window and you click on an insert. The plugin appears at the top of the insert selector pop-up menu.
Next under Automation be sure 'Smooth and Thin Data After Pass' is selected. Pro Tools will automatically smooth and thin the automation data created in an automation pass if this is set. Be sure to set the 'Degree of Thinning' also. I have mine set to "more". I would leave this higher - either 'more' or 'most'.
And finally, notice 'After Write Pass, Switch To'. This determines what happens after you write the first pass of automation. Touch mode writes automation only while a fader or switch is touched or clicked with a mouse. When the fader is released, the writing of automation stops and the fader returns to any previously automated position. Latch mode works in the same way but continues to write automation until you stop playback.
So that's it for the Preference settings in the Setup menu! I hoped this helps. I hope this lessens any intimidation you might have felt while looking through this particular menu item!
Until next time -
And HEY! make it a great day!
Tim
Thursday, September 3, 2015
Demystifying Pro Tools Preference Settings part 2/3
In the last blog post I covered the first tab under pro tools preferences - Display. Today I will cover Operation Preferences. First section is Transport: The very first selection 'Timeline Insertion/Play Start Marker Follows Playback' is important and I use it all the time. When selected, the Timeline Insertion
and the Play Start Marker both move to the
point in the timeline where playback stops.
When deselected, the Timeline Insertion and
Play Start Marker do not follow playback, but return
to the point in time where playback began. Many times I leave this deselected because I want to play a section of my song and I want playback to start from the same place every time. This way I can listen to the same section over and over for whatever reason. If you select it, then when you are in playback mode, wherever you stop and then restart, playback continues from wherever you stopped.
**This can also be selected/deselected from the Edit window - underneath the Edit Tools - the farthest right icon (looks like a rt. arrow with vertical line and play button).
The Numeric Keypad mode determines how the numeric keypad functions. The main thing I set this for is memory locations. Whether you have it set for Classic or Transport will determine how you recall different memory locations using the numeric keypad. This will be a personal preference for you. I use Transport setting, just because that is how I prefer to move to my memory locations when using the numeric keypad.
The really BIG ONE is Auto Backup. You DEFINITELY want to have this selected! This determines if pro tools automatically backs up your sessions! If hard drive space is limited you may only want to keep the last 3 backups and backup every hour. I think I normally keep the last 5 or 10 sessions and backup every 20 minutes. Ask yourself how much work and time you are ready to lose and have to re-do? Sometimes when I am working on an intense session or one with heavy work changes or with a client where a lot is happening, I will keep more back ups and back up at more frequent intervals. Other times it's not that critical so I decrease the number of backups and frequency. But every backup takes up hard drive space, so keep that in mind! As terabyte hard drives continue to come down in price, this becomes less of an issue!
On the right side is the Record preferences. The default settings here should be adequate for most people most of the time. I believe the default settings are Latch Record Enable Buttons (selected) and Link Record and Play Faders (selected). Also make sure Open-Ended Record Allocation is set to 'Use All Available Space'.
That's it for the Operation preference! We'll cover some others preference settings next time, so until then . . . .
HEY! Make it a Great Day!!
Tim
Subscribe to:
Posts (Atom)